Basic Concepts
The following sequence diagrams outline the high level call flow
involved in setting up a connection to the Pexip service. The
Client is your application making HTTP requests and the MCU is a
Pexip worker node in your deployment. Worker nodes are normally
discovered using DNS SRV for a specific domain.
If you’re using PexRTC in a Cordova app, most of these details will be hidden away from you but it’s very useful to have a proper understanding of what’s going on under the covers to help you debug. If you’re implementing a native app, this is essential.
Getting Access to the Conference
This call flow shows just the basic API participant flow. An API participant has no media associated with it but is a fully fledged participant that can control the conference, receive events, view the roster list, send and receive chat messages and also send / receive presentations. When developing your application it is important to get this call flow working reliably as it forms the basis for all communications with the MCU.
The token you receive must be used for all subsequent transactions with the MCU and it must be refreshed (the expiry time will be given to you). If you fail to provide a token or provide a token that is invalid or expired that request will fail and once the original request expires, your participant will be ejected from the conference.
If your conferencing worker nodes are behind some form of proxy e.g. a reverse proxy for load balancing you may need to deal with HTTP authentication challenges and or SSL certificate challenges.
Documentation for the client control requests can be found here
To discover the service via DNS SRV
(see
pexip DNS docs
for setup details), you should take the conference URI from the user
in the form of conference@domain.org and extract the domain and
conference parts. Perform a look up for _pexapp._tcp.domain.org to
see if there are any SRV records available for domain.org. If there
are none, you should just use the domains A record entry.
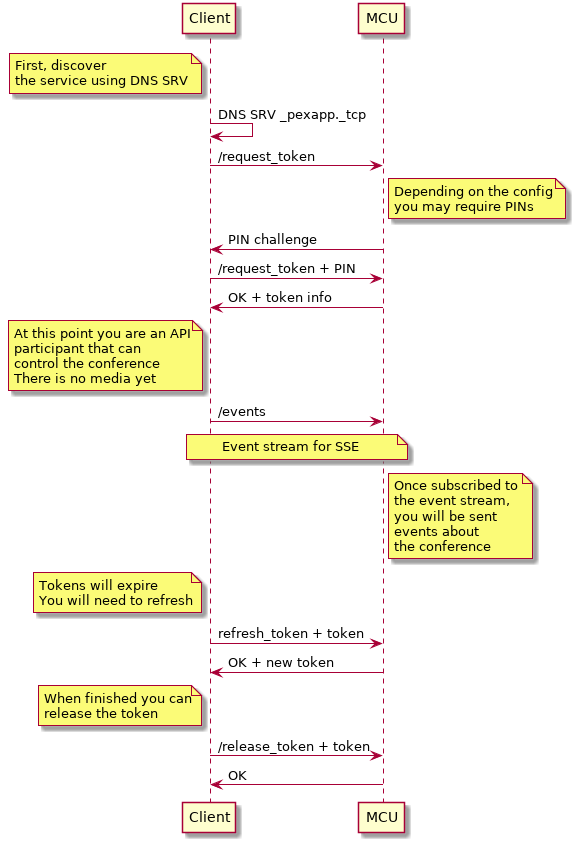
Once finished with your connection, you must perform the
release_token request so the MCU can clear down any resources taken
by your client and potentially end the conference. If you do not
release your token, the MCU will maintain the participant in the
roster list until the token expires.
Requesting a token
The token request is the very first contact you make with the client
API and determines all further actions. See
request_token for full
details. You will need to make sure that any services (VMRs, Gateway rules)
configured on your deployment have aliases that match what you are
dialing or you will receive a not found response. The
request_token exchange is also where you will deal with any PINs
that may have been configured on the services or supply conference
extensions for Virtual Reception Rooms. See the PIN protected
conferences and Virtual Receptions section of the above
request_token documentation.
Understanding your token
The token provides a large amount of information about the service you
are connecting to. The response to a successful request_token
should be parsed out to provide the correct feedback to the user. At
a minimum you should store the token string to use in headers for
all subsequent requests, the participant_uuid as this is needed in later
operations, your role as this will determine what you can and can’t
do in a conference and your service_type as this determines what
type of conference you are in or if you are in a waiting room.
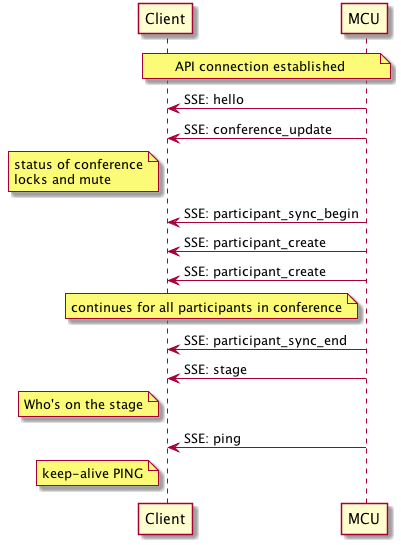
Subscribing to the event stream
Once you have a token you must subscribe to the event stream in order to receive further updates about the conference. See SSE docs. Once subscribed, you will receive an initial burst of events. You can use your own implementation of the W3C SSE spec or use a readily available off-the-shelf version.
Initial SSE flow when first connecting
When you first connect the event source, the MCU will send you a set of events so you can correctly display the initial list of participants in the roster and prepare yourself. The full list of events can be seen here
The initial participant sync is useful for creating the roster list of participants in your application and only happens on connection. Stage updates show you who is currently “on the stage” i.e. visible in the main window. You can find out who is talking by looking at the information in the participant update messages.
Dealing with subsequent SSEs
A full list of SSEs located here and
should be dealt with accordingly e.g. on a participant_create
message, you should add a participant into the roster and potentially
display this information to the user.
Refreshing a token
The expires field of the original request_token will give you a
time in seconds before the token expires. We recommend refreshing
your token at an interval of expires/2 seconds.
See
refresh token docs
for full information.
Releasing a token
This will disconnect you from the conference and clear any resources used by your participant. See release token docs for full details.
Great, now what ?
Once you are an API participant, you can now perform other functions like sending chat messages, sending and receiving presentations and starting audio/video. The following sections detail all of that for you. Head back home to carry on.